Most organizations work with Mac and Windows environments however most of them work in a single environment at a time. So, due to this, switching between two environments is very common. Here, we are talking about one such migration – Outlook for Mac to Microsoft Outlook for Windows. Current Mac users need to move OLM emails into Microsoft Outlook PST file format. With the help of this blog, let us know how this data migration can be performed.
Main reasons to move Outlook for Mac emails to MS Outlook
- Migration to another organization where Windows environment is using
- Switch from Mac system to Windows PC in an organization
- Need to save Outlook for OLM files backup on Windows environment
- Sharing of OLM data to MS Outlook users
- OLM file can be directly opened in Windows Outlook so the import is required
Outlook for Mac stored data in OLM files that do not open directly in the Windows environment. When users try to access the OLM file in Windows Outlook, they get this error: To access OLM emails to Outlook, the conversion of OLM file to PST file format is needed which requires a reliable professional utility. Although there is a manual trick to move OLM emails to Microsoft Outlook which we will be discussing in this post.
How to import Mac OLM emails to MS Outlook 2019, 2016, & 2013?
Using Gmail IMAP Configuration
In this method, the Gmail IMAP configuration works as a medium between Outlook for Mac and MS Outlook for Windows email clients. By this, we will move Outlook for Mac OLM files to MS Outlook.
Users can Convert Mac Outlook emails, contacts, and calendars, etc. to the desired destination using the Export feature in the Tools head of the Outlook for Mac application.
| Note: This method is used for Outlook 2019, 2016, and 2013 versions. |
- Go to Outlook for Mac email client. Go to Tools and choose Accounts.
- Click on the ‘+’ icon under Add account option and enter details like:
Username and password of Gmail account
Incoming Server: imap.gmail.com, SSL, Port number: 143
Outgoing Server: smtp.gmail.com, SSL, Port no: 465
Click on add account once the details are entered and confirmed
- The account connection is built up with the synchronization process.
- Once the Gmail account is visible, create a Gmail label within the IMAP settings of the Gmail account to move OLM data to the Gmail IMAP mailbox.
- Start migrating OLM data to the added Gmail account using the drag & drop option or using the Move > Choose folder option after right-click the mailbox folder that you want to move to the Gmail mailbox.
- This will transfer all OLM file data into a Gmail account. Now configure it in the Outlook application.
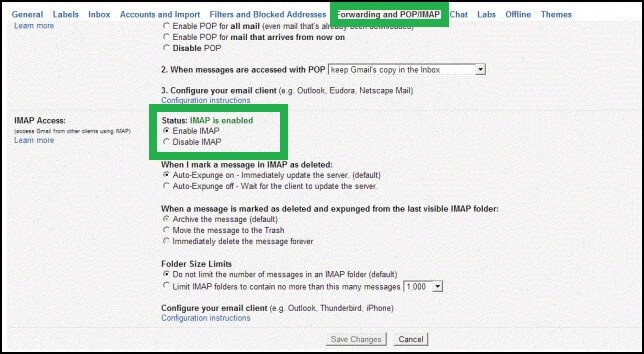
| Note: Kindly enable the IMAP option in Gmail before Gmail configuration in Outlook or Outlook for Mac application. You can find this option in the settings section in Gmail account. It is to be found in the Forwarding and POP/IMAP option head under IMAP access. This clearly appears on the given image: |

- In the Outlook application, go to the Account Settings feature and add this Gmail account as done in Outlook for Mac application.
- In the Outlook application, click on Send/Receive feature to refresh the synchronization. The data transferred from Outlook for Mac to Gmail is now moved into the Outlook application.
Problems with Gmail IMAP Configuration Method
You are able to receive successful results by importing OLM emails into the Outlook application with the above-discussed method but it does not always provide secure results. It is very common to make mistakes that interrupt the complete process. Also, non-technical users find this method difficult to understand. Data integrity is also compromised. There is no assurance of getting exact data after the import.
However, to avoid all these limitations, it is recommended to invest in a reliable professional tool Mailvita OLM emails to MS Outlook Converter. The software is equipped with advanced features like batch migration, 100% data safety, filters, etc. to perform the migration. The entire process of conversion does not depend on the installation of any email clients.
To have a clear understanding of the software interface and functions, we have provided the complete work of the software.
Working of OLM Outlook to Windows Outlook PST Converter
- Install and launch OLM to PST Converter on your Mac device.
- Use the Browse button and load Outlook for Mac OLM file.
- Check OLM file data and mark all/desired items to export from the OLM file.
- Set a destination path to save the resultant PST file.
- Press the Generate Now button and get the converted PST file in a few minutes.
MS Outlook Mac data is smartly moved into the Microsoft Outlook application.
The best thing about its software is it is operated easily on all Mac and Windows OS versions. Its work is too simple and you can get desired results in a short time period with it.
Ending Lines
Switching of email clients of different environments needs migration and for this migration, choosing a perfect solution is very important. Through this post, we have explained how users can import Outlook for Mac OLM emails to Outlook. For this, we have provided the Gmail IMAP configuration process which is a little tough to implement by non-tech users so we keep coming up with a professional tool that suits all users and is very simple to use.

